stream {
    resolver 8.8.8.8 1.1.1.1;
    server {
        listen 443;
        ssl_preread on;
        proxy_connect_timeout 10s;
        proxy_timeout 1h;
        proxy_pass $ssl_preread_server_name:443;
    }
}
stream {
resolver 8.8.8.8 1.1.1.1;
server {
listen 443;
ssl_preread on;
proxy_connect_timeout 10s;
proxy_timeout 1h;
proxy_pass $ssl_preread_server_name:443;
}
}
<div id="Search_Pro_Version" class="formstyle_embed" zc_mobileView='inline' elName='zc-component' formLinkName='Search_Pro_Version' params='zc_Header=false&zc_SuccMsg=Data Added Successfully!&zc_SubmitVal=Submit&zc_ResetVal=Reset&zc_Focus=false&Gender=<%=input.Gender%>&Inventory=<%=input.Inventory%>&Category=<%=input.Category%>&Collection=<%=input.Collection%>&Discount=<%=input.Discount%>&Color=<%=input.Color%>&Size=<%=input.Size%>&Article_No=<%=input.ArticleNo%>'>Loading Form...</div>
# 更新动态邮件组属性以强制刷新
Set-DynamicDistributionGroup -Identity "YourDynamicTeamEmail" -Notes "Updated to refresh members" -ForceMembershipRefresh
Azure Connect: https://www.alitajran.com/wp-content/uploads/setups/AzureADConnect-1.6.16.0.msi
How to disable sync: https://www.youtube.com/watch?v=zdOliNam4VU https://techpress.net/converting-synced-user-to-in-cloud-only-user-account-on-office365/
[Net.ServicePointManager]::SecurityProtocol = [Net.SecurityProtocolType]::Tls12
Connect-MsolService 
https://learn.microsoft.com/zh-cn/microsoft-365/enterprise/prepare-a-non-routable-domain-for-directory-synchronization?redirectSourcePath=%252fen-us%252farticle%252fHow-to-prepare-a-non-routable-domain-such-as-local-domain-for-directory-synchronization-e7968303-c234-46c4-b8b0-b5c93c6d57a7&view=o365-worldwide 准备不可路由域以进行目录同步
https://www.codetwo.com/admins-blog/how-to-merge-an-office-365-account-with-an-on-premises-ad-account-after-hybrid-configuration/#two-mailboxes 如何在混合配置后将 Office 365 帐户与本地 AD 帐户合并?
https://learn.microsoft.com/en-us/answers/questions/716754/azure-ad-connect-error-unique-value
powershell 4.0 升级 5.1
https://qiaolb.github.io/azure-nuget-https.html
强制关联:Set-MsolUser -UserPrincipalName xxxx@xxxx.com -ImmutableId xxxxxx
混合部署要求 https://learn.microsoft.com/zh-cn/exchange/hybrid-deployment-prerequisites
Calendar不显示 https://appuals.com/fix-calendar-missing-in-microsoft-teams-on-windows-10/
测试 https://testconnectivity.microsoft.com/tests/teams
完整Hybrid Configuration Wizard
打不开outlook可能是权限分重复了
转发不了邮件是要开启enable-organizationcustomization
收不到邮件可能是exchange server的routing选择不对
单独关闭一个用户的On-premises
全部关闭azure同步:
Set-MsolDirSyncEnabled -EnableDirSync $false
https://learn.microsoft.com/en-us/microsoft-365/enterprise/turn-off-directory-synchronization?view=o365-worldwide
From the Magento root directory, switch to production mode:
bin/magento deploy:mode:set production
Enable JavaScript bundling:
bin/magento config:set dev/js/enable_js_bundling 1
Optimize bundling by minifying JavaScript files:
bin/magento config:set dev/js/minify_files 1
Enable cache busting on static file URLs. This ensures users get the latest version of the assets anytime they update:
bin/magento config:set dev/static/sign 1
To configure JavaScript bundling, you must disable Javascript file merging. Bundling will not work as the merging of files excludes bundling:
bin/magento config:set dev/js/merge_files 0
Enable move JavaScript to bottom :
bin/magento config:set dev/js/move_script_to_bottom 1
Deploy Static content for specific Theme
php bin/magento setup:static-content:deploy --theme {Vendor}/{theme} en_US
//curl -X PUT "http://192.168.71.52:9200/shirtcity_design_de_v1" -H 'Content-Type: application/json' -d'
{
  "settings": {
    "analysis": {
      "analyzer": {
        "sc_analyzer": {
          "tokenizer": "sc_tokenizer"
        }
      },
      "tokenizer": {
        "sc_tokenizer": {
          "type": "ngram",
          "min_gram": 3,
          "max_gram": 3,
          "token_chars": [
            "letter",
            "digit"
          ]
        }
      }
    }
  },
  "mappings": {
    "designs": {
      "properties": {
        "big_template": {
          "type": "text",
          "fields": {
            "keyword": {
              "type": "keyword",
              "ignore_above": 256
            }
          }
        },
        "checkout": {
          "type": "long"
        },
        "design_id": {
          "type": "text",
          "fields": {
            "keyword": {
              "type": "keyword",
              "ignore_above": 256
            }
          }
        },
        "group": {
          "type": "text",
          "fields": {
            "keyword": {
              "type": "keyword",
              "ignore_above": 256
            }
          }
        },
        "location": {
          "type": "text",
          "fields": {
            "keyword": {
              "type": "keyword",
              "ignore_above": 256
            }
          }
        },
        "name": {
          "type": "text",
          "fields": {
            "keyword": {
              "type": "keyword",
              "ignore_above": 256
            }
          },
          "analyzer": "sc_analyzer"
        }
      }
    }
  }
}
对于线上僵死进程问题的排查,一般需要如下命令工具:

ps -aux // 得到僵死进程pid

strace -p pid // 查看僵死进程底层的调用信息,获取到 fd

lsof -d FD // 查看fd对应文件信息

gdb --pid=PID // 通过gdb查看代码调用信息

tcpdump // 抓网络包
批量kill进程:for proc in $(lsof -d 94 |grep “xxx.xxx.xxx.xxx” |awk ‘{print $2}’); do kill $proc; done
Imagine you need to run a Magento 2 installation from a sub-directory, using Nginx, but you don’t have ownership of the main site, just the sub-directory.
So we are not talking here about store view codes, redirect loops etc, we are talking about this:
Server 1 : www.website.domain
/shop/ -> IP Server 2
Server 2 : www.website.domain/shop/
Magento 2 has differences in terms of application structure and directories with Magento 1. (see image below)
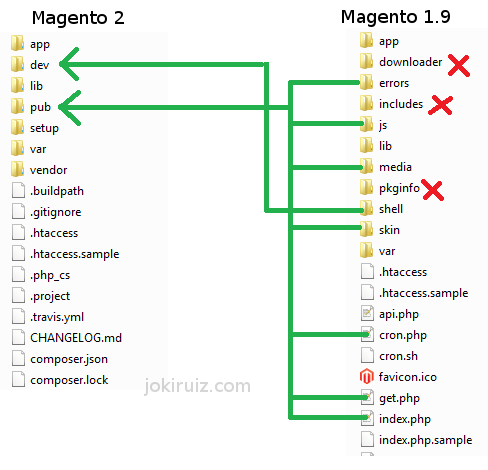
The most important difference here is the endpoint. While in Magento 1 the endpoint is the index file of the Magento installation, “[magento]/index.php”, in Magento 2, the endpoint is inside the pub folder, “/[magento]/pub/index.php”.
Therefore all request for each store-view will go through this folder.
For each Base URL you have to add a sub-folder at the end, so if you need to have www.website.domain/shop You will need to create :
mkdir ~/[magento]/pub/shopThen you need to create symlinks inside the sub-folder just created to the static content folders, like ‘media’, ‘static’… This is necessary because Magento 2 will go to gather this information inside the reference given by the endpoint, that is inside the “pub/shop” folder.
For example:
ln -s ../media media
ln -s ../static static
For the index.php, instead of symlink. You need to copy it and modify the relative path for the app/bootstrap script. Like follows:
Change:
require realpath(DIR) . ‘/../app/bootstrap.php’;To:
require realpath(DIR) . ‘/../../app/bootstrap.php’;And finally, make sure that the entry point of the Nginx file points to the correct folder.
location /shop/ {
 try_files $uri $uri/ /shop/index.php$is_args$args;
}
# PHP entry point for main application
location ~ (index|get|static|errors/report|errors/404|errors/503|health_check|__info)\.php$ {
    try_files $uri =404;
    fastcgi_pass   fastcgi_backend;
    fastcgi_buffers 16 16k;
    fastcgi_buffer_size 32k;

    fastcgi_param  PHP_FLAG  "session.auto_start=off \n suhosin.session.cryptua=off";
    fastcgi_param  PHP_VALUE "memory_limit=2048M \n max_execution_time=18000";
    fastcgi_read_timeout 600s;
    fastcgi_connect_timeout 600s;

    fastcgi_index  index.php;
    fastcgi_param  SCRIPT_FILENAME  $document_root$fastcgi_script_name;
    include        fastcgi_params;
}
printf("%2c", 355)
固定包头的方法非常通用,在服务器端程序中经常能看到。这种协议的特点是一个数据包总是由包头 + 包体 2 部分组成。包头由一个字段指定了包体或整个包的长度,长度一般是使用 2 字节 /4 字节整数来表示。服务器收到包头后,可以根据长度值来精确控制需要再接收多少数据就是完整的数据包。Swoole 的配置可以很好的支持这种协议,可以灵活地设置 4 项参数应对所有情况。