magento

Some important command in Magento2 after you change the mode to production

From the Magento root directory, switch to production mode:

bin/magento deploy:mode:set production

Enable JavaScript bundling:

bin/magento config:set dev/js/enable_js_bundling 1

Optimize bundling by minifying JavaScript files:

bin/magento config:set dev/js/minify_files 1

Enable cache busting on static file URLs. This ensures users get the latest version of the assets anytime they update:

bin/magento config:set dev/static/sign 1

To configure JavaScript bundling, you must disable Javascript file merging. Bundling will not work as the merging of files excludes bundling:

bin/magento config:set dev/js/merge_files 0

Enable move JavaScript to bottom :

bin/magento config:set dev/js/move_script_to_bottom 1

Deploy Static content for specific Theme

php bin/magento setup:static-content:deploy --theme {Vendor}/{theme} en_US


Run Magento 2 from a sub-directory with nginx

Imagine you need to run a Magento 2 installation from a sub-directory, using Nginx, but you don’t have ownership of the main site, just the sub-directory.

So we are not talking here about store view codes, redirect loops etc, we are talking about this:

Server 1 : www.website.domain
/shop/ -> IP Server 2
Server 2 : www.website.domain/shop/

The problem

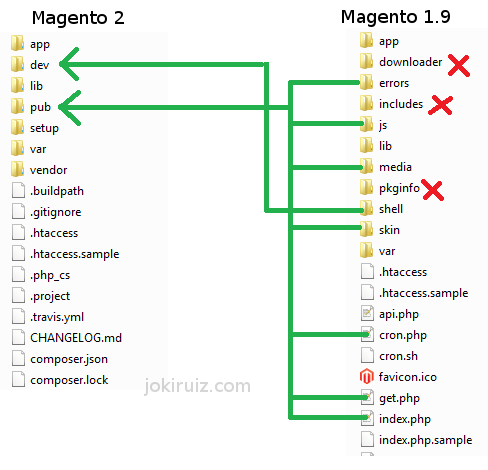
Magento 2 has differences in terms of application structure and directories with Magento 1. (see image below)

How to run Magento 2 from a subdirectory. Magento version comparison

The most important difference here is the endpoint. While in Magento 1 the endpoint is the index file of the Magento installation, “[magento]/index.php”, in Magento 2, the endpoint is inside the pub folder, “/[magento]/pub/index.php”.

Therefore all request for each store-view will go through this folder.

Create Subfolders

For each Base URL you have to add a sub-folder at the end, so if you need to have www.website.domain/shop You will need to create :

mkdir ~/[magento]/pub/shop

Create Symlinks

Then you need to create symlinks inside the sub-folder just created to the static content folders, like ‘media’, ‘static’… This is necessary because Magento 2 will go to gather this information inside the reference given by the endpoint, that is inside the “pub/shop” folder.

For example:

ln -s ../media media
ln -s ../static static

For the index.php, instead of symlink. You need to copy it and modify the relative path for the app/bootstrap script. Like follows:

Change:

require realpath(DIR) . ‘/../app/bootstrap.php’;

To:

require realpath(DIR) . ‘/../../app/bootstrap.php’;

Nginx Configuration

And finally, make sure that the entry point of the Nginx file points to the correct folder.

location /shop/ {
 try_files $uri $uri/ /shop/index.php$is_args$args;
}
# PHP entry point for main application
location ~ (index|get|static|errors/report|errors/404|errors/503|health_check|__info)\.php$ {
    try_files $uri =404;
    fastcgi_pass   fastcgi_backend;
    fastcgi_buffers 16 16k;
    fastcgi_buffer_size 32k;

    fastcgi_param  PHP_FLAG  "session.auto_start=off \n suhosin.session.cryptua=off";
    fastcgi_param  PHP_VALUE "memory_limit=2048M \n max_execution_time=18000";
    fastcgi_read_timeout 600s;
    fastcgi_connect_timeout 600s;

    fastcgi_index  index.php;
    fastcgi_param  SCRIPT_FILENAME  $document_root$fastcgi_script_name;
    include        fastcgi_params;
}


How the full page cache works in Magento 2

This Magento 2 tutorial looks at the Magento 2 full page cache (FPC). The FPC is a key performance feature in Magento 2, but differs significantly from the Magento 1 FPC.

One of the most notable aspects of FPC in Magento 2 is that it is now a standard feature in the Community Edition (CE). In Magento 1 FPC was an Enterprise Edition (EE) feature only, which meant that CE users had to buy a module to get this sort of functionality.

The other equally notable aspect of Magento 2’s FPC is that Varnish integration is available in FPC with only minimal configuration, which means that caching is at the heart of Magento 2 rather than an afterthought.

Changes at a glance

Magento 1 Magento 2
EE only feature CE and EE feature
Varnish distance from FPC Varnish integrated
Built-in option only Built-in and Varnish options
Built-in recommended for production Varnish recommended for production
Hole punching for private content Placeholders and AJAX/local storage for private content
Javascript used as a workaround to deliver private content Javascript integral to delivering private content

The built-in FPC option

(continue reading…)


Magento deploy

1. php bin/magento deploy:mode:set production
2. rm -rf var/di/* && rm -rf var/generation/* && rm -rf var/cache/* && rm -rf var/page_cache/* && rm -rf var/view_preprocessed/* && rm -rf pub/static/* && rm -rf generated/* && php bin/magento setup:upgrade && php bin/magento setup:di:compile
3. php bin/magento setup:static-content:deploy fi_FI en_US sv_SE -f && php bin/magento indexer:reindex && php bin/magento maintenance:disable && php bin/magento cache:clean && php bin/magento cache:flush


overwrite render list

You have to override two core checkout xml file for override default.phtml file in magento 2,

app/code/XYZ/Checkout/view/frontend/layout/checkout_cart_index.xml

<?xml version="1.0"?>
<page xmlns:xsi="http://www.w3.org/2001/XMLSchema-instance" layout="1column" xsi:noNamespaceSchemaLocation="urn:magento:framework:View/Layout/etc/page_configuration.xsd">
    <body>
        <referenceBlock class="Magento\Checkout\Block\Cart" name="checkout.cart.form">
            <block class="Magento\Framework\View\Element\RendererList" name="checkout.cart.item.renderers.override" as="renderer.list.custom"/>
            <arguments>
                <argument name="renderer_list_name" xsi:type="string">checkout.cart.item.renderers.override</argument>
            </arguments>
        </referenceBlock>
    </body>
</page>

app/code/XYZ/Checkout/view/frontend/layout/checkout_cart_item_renderers.xml

<?xml version="1.0"?>
<page xmlns:xsi="http://www.w3.org/2001/XMLSchema-instance" xsi:noNamespaceSchemaLocation="urn:magento:framework:View/Layout/etc/page_configuration.xsd">
    <body>
        <referenceBlock name="checkout.cart.item.renderers.override">

            <block class="Magento\Checkout\Block\Cart\Item\Renderer" as="default" template="XYZ_Checkout::cart/item/default.phtml" />              

            <block class="Magento\Checkout\Block\Cart\Item\Renderer" as="simple" template="XYZ_Checkout::cart/item/default.phtml" />   

        </referenceBlock>
    </body>
</page>


magento翻译

1. In .ptml files

  • Use the function  __()

__(‘<your_string>’)

  • For example:
  • If your string contains a variable,you can use::
  • In this example, the ‘Hello %s’ string is added to the dictionary when the i18n tool is run.

2. In email template

If your theme contains custom email template, use the {{trans}} directive.

3. Strings added in UI components’ templates

  • A string is added in the scope of an HTML element:
  • A string is added with no binding to an HTML element:

4.Strings added in UI components configuration files

  • Use the translate attribute in .xml files:

5.Strings added in .js files

  • Define
  • Use the $.mage.__(”) function when adding a string:
  • If your string contains a variable:

The  5 steps I mention above is the shortest process for you to Translate a String by Code in Magento 2. With this guide, you can manage the String by Code in Magento 2 easily. Every store has a String by Code in Magento 2 with many attributes.


Magento getUrl

To Retrieve URL path in STATIC BLOCK

Java代码 收藏代码
To get SKIN URL
{{skin url=’images/sampleimage.jpg ‘}}

To get Media URL
{{media url=’/sampleimage.jpg’}}

To get Store URL
{{store url=’mypage.html’}}

To get Base URL
{{base url=’yourstore/mypage.html’}} (continue reading…)


如何修改、扩展并重写Magento代码

作为一个开发者的你,肯定要修改 Magento 代码去适应你的业务需求,但是在很多时候我们不希望修改 Magento 的核心代码,这里有很多原因, 例如将来还希望升级 Magento 、还想使用更多的Magento代码。如果你正在寻找修改Magento代码的最佳方式,那么此篇文章将会是一个不错的教程。
(continue reading…)


Magento产品的三种关联方式:Related products, Up-sells, Cross-sells

Magento Upsells

当用户进入到一个产品页面时,Upsells关联产品会显示在该页面的下方,表示与该产品相类似的一些产品,它们的质量更好,品牌更好,或者说能给商家带来更丰厚的利润的类似产品。如果顾客对该产品不满意,可以从这些相似产品中选择。例如客户在选购Thinkpad笔记本电脑,Upsells中一般应该显示其它笔记本电脑,T系列,X系列,又或者是戴尔的XPS系列等。

Magento Related Products

Related products同样显示在产品详细页面中,与Upsells不同,Related products默认会显示在右侧边栏。这些产品被用来设计推荐给用户该产品之外的配套产品。比如用户在浏览笔记本电脑的时候,在右侧的Related products中可能会显示笔记本电脑鼠标,笔记本电脑屏幕保护膜等产品。

Magento Cross-sells

Crooss-sells产品会显示在结账时的购物车中。当用户添加产品到购物车后,准备结账时,都会进入购物车页面。Cross-sells关联的产品会显示在购物车页面下部的左侧。在Magento系统的设计中,Cross-sells与上面两个类型的关联产品完全不同。比如说用户购买笔记本电脑之后,进入到购物车页面,Cross-sells产品可能不会是与电脑相关的任何产品,而是杂志,糖果等其它主题的产品。


Magento Static Block

Magento中的static block是通过后台来创建和修改的,static block可以作为一个静态的区块在单个页面或多个页面上调用。管理员可以通过后台方便的修改static block中的内容。如果你需要在页面上显示一小块静态的区域内容,而又不需要重新建立一个CMS页面比如about us,term的时候,static block能很好的解决这个问题。

在Magento默 认安装后,static block是如何显示的呢?例如电子产品分类页,用一个static block代替默认的产品列表页面。用static block的好处是管理员能够方便的在后台去修改static block中的内容而不需要去修改任何模板代码。另外一个如果使用static block的例子可以在Magento演示站点的首页可以看的到。比如左侧的’Buy Canon Rebel’和右侧’Back to School’促销区块在默认并没有使用 static block,但是像这样的商城促销信息我们经常可以用static block来做。 (continue reading…)


Copyright © 1996-2010 Add Lives. All rights reserved.
iDream theme by Templates Next | Powered by WordPress