安装地址:https://about.gitlab.com/downloads/
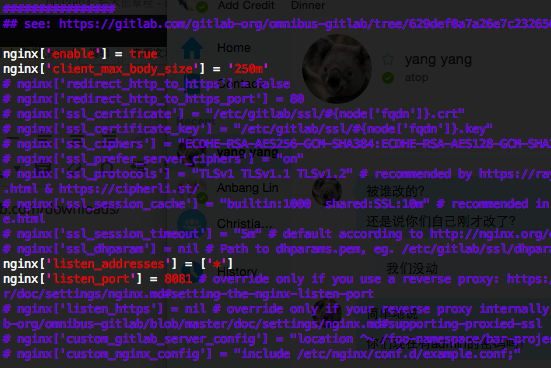
默认是nginx服务器80端口,如果用80 apache,需要改为其它端口(注意8080己被unicorn占用)。
配置apache反向代理
a2enmod proxy proxy_http
#This configuration has been tested on GitLab 6.0.0 and GitLab 6.0.1
#Note this config assumes unicorn is listening on default port 8080.
#Module dependencies
#  mod_rewrite
#  mod_proxy
#  mod_proxy_http

  ServerName yourdomain
  ServerSignature Off

  ProxyPreserveHost On

  # Ensure that encoded slashes are not decoded but left in their encoded state.
  # http://doc.gitlab.com/ce/api/projects.html#get-single-project
  AllowEncodedSlashes NoDecode


    # New authorization commands for apache 2.4 and up
    # http://httpd.apache.org/docs/2.4/upgrading.html#access
    Require all granted

    ProxyPassReverse http://127.0.0.1:8081
    ProxyPassReverse http://yourdomain/


  #apache equivalent of nginx try files
  # http://serverfault.com/questions/290784/what-is-apaches-equivalent-of-nginxs-try-files
  # http://stackoverflow.com/questions/10954516/apache2-proxypass-for-rails-app-gitlab
  RewriteEngine on
  RewriteCond %{DOCUMENT_ROOT}/%{REQUEST_FILENAME} !-f
  RewriteRule .* http://127.0.0.1:8081%{REQUEST_URI} [P,QSA]

  # needed for downloading attachments
  DocumentRoot /opt/gitlab/embedded/service/gitlab-rails/public

  #Set up apache error documents, if back end goes down (i.e. 503 error) then a maintenance/deploy page is thrown up.
  ErrorDocument 404 /404.html
  ErrorDocument 422 /422.html
  ErrorDocument 500 /500.html
  ErrorDocument 503 /deploy.html

  LogFormat "%{X-Forwarded-For}i %l %u %t \"%r\" %>s %b" common_forwarded
  ErrorLog  /var/log/apache2/yourdomain/error.log
  CustomLog /var/log/apache2/yourdomain/forwarded.log common_forwarded
  CustomLog /var/log/apache2/yourdomain/access.log combined env=!dontlog
  CustomLog /var/log/apache2/yourdomain/yourdomain.log combined
参考:https://gitlab.com/gitlab-org/gitlab-recipes/blob/master/web-server/apache/gitlab-apache2.4.conf
重启gitlab: gitlab-ctl reconfigure
重启apache.
Gitlab 创建备份
使用Gitlab一键安装包安装Gitlab非常简单, 同样的备份恢复与迁移也非常简单. 使用一条命令即可创建完整的Gitlab备份:
gitlab-rake gitlab:backup:create
使用以上命令会在/var/opt/gitlab/backups目录下创建一个名称类似为1393513186_gitlab_backup.tar的压缩包, 这个压缩包就是Gitlab整个的完整部分, 其中开头的1393513186是备份创建的日期.
Gitlab 修改备份文件默认目录
你也可以通过修改/etc/gitlab/gitlab.rb来修改默认存放备份文件的目录:
gitlab_rails['backup_path'] = '/mnt/backups'
/mnt/backups修改为你想存放备份的目录即可, 修改完成之后使用gitlab-ctl reconfigure命令重载配置文件即可.
Gitlab 自动备份
也可以通过crontab使用备份命令实现自动备份:
sudo su -
crontab -e
加入以下, 实现每天凌晨2点进行一次自动备份:
0 2 * * * /opt/gitlab/bin/gitlab-rake gitlab:backup:create
Gitlab 恢复
同样, Gitlab的从备份恢复也非常简单:
# 停止相关数据连接服务
gitlab-ctl stop unicorn
gitlab-ctl stop sidekiq

# 从1393513186编号备份中恢复
gitlab-rake gitlab:backup:restore BACKUP=1393513186

# 启动Gitlab
sudo gitlab-ctl start
Gitlab迁移
迁移如同备份与恢复的步骤一样, 只需要将老服务器/var/opt/gitlab/backups目录下的备份文件拷贝到新服务器上的/var/opt/gitlab/backups即可(如果你没修改过默认备份目录的话). 但是需要注意的是新服务器上的Gitlab的版本必须与创建备份时的Gitlab版本号相同. 比如新服务器安装的是最新的7.60版本的Gitlab, 那么迁移之前, 最好将老服务器的Gitlab 升级为7.60在进行备份.
其他
最新版本的Gitlab已经修复了HTTPS设备的BUG, 现在使用官方HTTPS配置即可轻松启用HTTPS.
